Using Net Health Employee Health and Occupational Medicine Charting Templates - VISIT
If you haven't already done so, please read Net Health Employee Health and Occupational Medicine Provider Charting Overview and Using Charting Templates before proceeding. As you work, you may have questions about the Provider Charting Menu Bar.
The Provider Charting Glossary explains a number of Net Health Employee Health and Occupational Medicine Charting specific terms.
Summary
This topic covers the entry of information in an Net Health Employee Health and Occupational Medicine Charting Template by the provider, and the building of the final charting note. To understand this topic, you must read EMR Net Health Employee Health and Occupational Medicine Provider Charting Overview, Using Provider Charting Templates, and Using Wizards before proceeding.
While building the charting note you will be able to view the patient's clinical problems list on the left of the window. A single click will take you to the full patient chart. You can also prescribe medications and print scripts, and create a variety of types of physician's orders to be implemented by other members of the staff. A menu bar on the right of the screen provides access to additional functions.
What Do You Want to Do?
View a Charting Template
The charting workspace is comprised of two windows, the [Generate Patient EMR Charting Note window where the work is done, and the clinical problems lists sidebar, available for quick reference. Read the topic Charting Workspace Problems Lists to learn more.
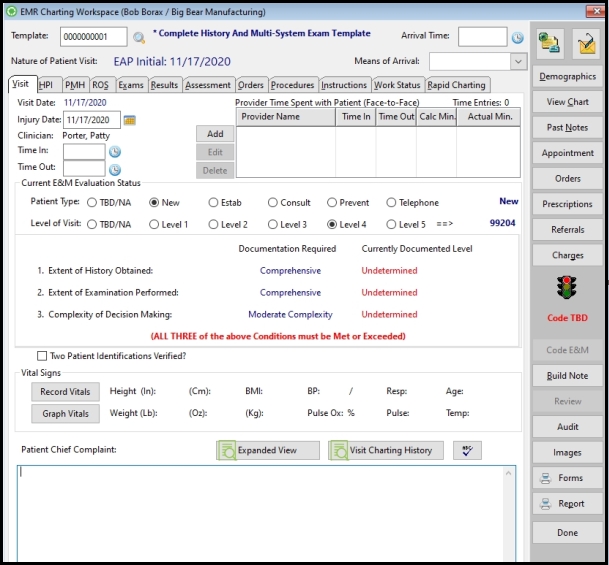
Main Work Area
Notice the tabbed areas. Clinicians typically work on the first four.
Visit tab Using E&M Coding Rules 1995 or 1997
-
Injury Date: Enter the Patient date of injury, or use the calendar icon for assistance.
-
Time In: Enter the time either the Clinician began the patient visit, or use the clock icon for assistance.
-
Time Out: Enter the time either the Clinician ended the patient visit, or use the clock icon for assistance.
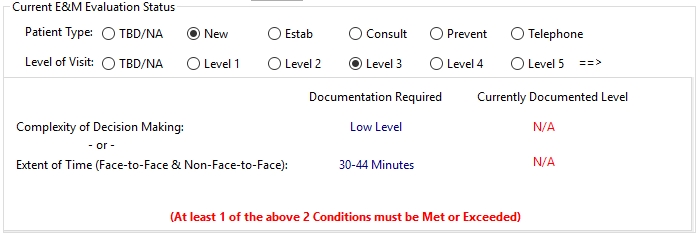
Current E&M Evaluation Status
-
Select your patient type.
-
Select the Level of the Visit.
The E&M Evaluation Status will display based on your visit entries. For further information, see How to Perform E&M Coding.
Visit tab Using E&M Coding Rules 2021
For a video demonstration of the 2021 Guideline Changes for Entry of Time, click here.

-
Injury Date: Enter the Patient date of injury, or use the calendar icon for assistance.
-
Time In: Enter the time either the Clinician began the patient visit, or use the clock icon for assistance.
-
Time Out: Enter the time either the Clinician ended the patient visit, or use the clock icon for assistance.
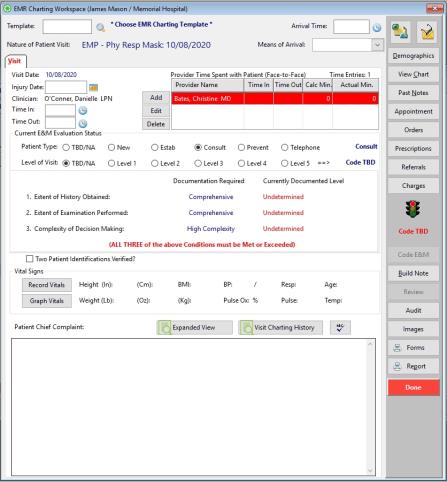
Provider Time Spent with the Patient (Face-to-Face): Add, Edit, or Delete time entries that represent the face-to-face time spent by the Provider with the patient
Add:
Click Add to display the following window:
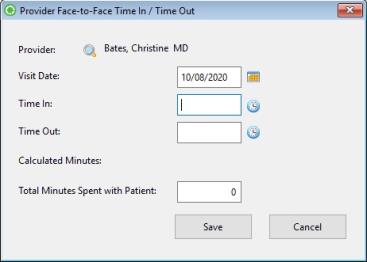
The Visit Date is populated with current visit. Users may enter a different Visit Date or select one from the calendar icon.
Users may enter patient time by entering either Time In / Time Out and let the system calculate the minutes or users may manually enter the actual time in minutes.
-
Time In: Enter the time either the Clinician or Provider began the patient visit, or use the clock icon for assistance.
-
Time Out: Enter the time either the Clinician or Provider ended the patient visit, or use the clock icon for assistance.
-
Calculated Minutes: the system will calculate the total minutes spent with the patient.
Total Minutes Spent with Patient: Enter the total minutes spent with the patient which will override the time entries above. Entry of minutes in this field should only be done when the provider has had an interruption during the time with the patient.
Click Save to record the data, click Cancel to clear your entries.
If the record is saved and there are missing entries or errors, the system will indicate additional action through red highlights and red text as show below:
Edit
Click Edit to display the Provider Face-to-Face Time In / Time Out window:
Make your changes.
Click Save to record the data, click Cancel to clear your entries.
If the record is saved and there are missing entries or errors, the system will indicate additional action through red highlights and red text.
Delete
Highlight the record you wish to delete and click the Delete button. A confirmation warning message will display. Select Yes to delete the record or No to cancel your request.
If you are using the 2021 E&M Coding rules and the EMR System Parameter, Prompt Provider for Visit Time when EMR Charting is checked, the system will prompt you upon entering the EMR Charting space so you may enter visit times through the Provider Face-to-Face Time In / Time Out window.
If the patient times entered or altered through the EMR Charting Workspace-Visit tab are changed, the system will replace the new times in both windows. Once information is recorded in the EMR, the visit time may only be altered within the EMR and will not be able to edit time on the Enter Visit window.
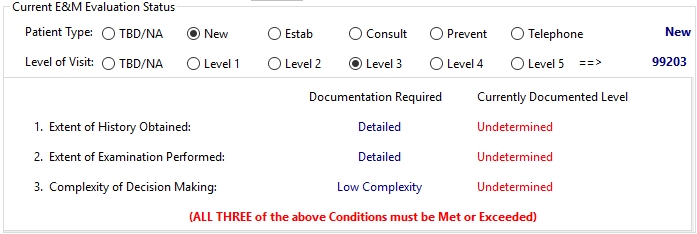
Current E&M Evaluation Status
-
Select your patient type.
-
Select the Level of the Visit.
The E&M Evaluation Status will display based on your visit entries. For further information, see How to Perform E&M Coding. The 2021 Guidelines allow for the E&M code to be based on either time or Medical Decision Making. Also for the 2021 E&M guidelines, the system has the ability to code Prolonged Visit Time using the published rules.
NOTE: Changes to the E&M Evaluation Status only apply for New and Established patients. When selecting Consultation, Preventative, and Telephone patients, the system will following the E&M Coding process used in the 1995 and 1997 rules.
-
Visit Tab

Get Started
-
Select the appropriate template for the patient's complaint for Current EMR Template at the top of the window. To do so, click the table icon
 , then search for and select from the list displayed. The template can be changed later, if need be. Doing so will not affect the information already collected. The template simply controls the screens used to collect information going forward.
If you have created a new Template, and do not see it here, it may be that the Visit Type was not correctly set up. That option determines the types of visits for which the Template is available.
-
Tap the clock icon

beside Provider In to register the current time. This can be edited if need be. If you are using a Tablet PC, the handwriting recognition feature can be used to write the time you want. Read the topic on Editing Features to learn more.
-
If not already done, select the correct Patient Type. This will control the E/M CPT Code charges available for the visit. The E/M level calculated for New Patient and Established Patient are based on the level of documentation. For an Office Consultation, the provider selects the CPT code based on the nature of the visit. For a Preventive Medicine visit, the provider selects based on age of the patient and nature of the visit. For a telephone call, the provider selects based on length of the call. A list of CPT codes for each type of visit, along with an explanation of when each is used, can be found in the topic on How Net Health Employee Health and Occupational Medicine Makes E/M Calculations.
-
Select the anticipated Level of Visit. The Current Overall Compliance Evaluation section will then show the documentation required for this level of visit in each of three areas. As you work, it will show the level of documentation you have provided so far. If you have met or exceeded the level required, the Currently Documented Level will be green. If not, it will be red.
Complete the visit
-
Code the visit. Net Health Employee Health and Occupational Medicine gives feedback on the level of visit your current documentation supports.
-
Click the Build Button to Build and sign the note. When signed the note is locked and no further changes can be made.
-
You can lock the note without an electronic signature by checking the Manually Lock box.
-
Click OK when done.

You can review the note at any time by clicking the Review button on the menu bar of the [Generate Patient EMR Charting Note] window. If it has been locked, at the bottom you will see stated in red "Record is Locked", and you will not be able to make changes. You can create an addendum as described below.
The note can also be viewed from the visit record. The Review Note button only becomes available when the note is built. Note can also be seen on the CHARTING tab of the Patient Chart.
If the charting note has been locked and changes need to be made, you can add an addendum. This is discussed in the topic How to Build, Sign, Lock and Addend a Charting Note.
-
-
Note: Different clinics organize their work flows to best fit their circumstances and needs.
-
HPI tab - History of Present Illness
-
PMH tab - Past Medical History
-
ROS tab - Review of Systems
-
EXAM tab
-
RESULTS tab
-
ASSESSMENT tab
-
ORDERS tab
-
PROCEDURES tab
-
INSTRUCTIONS tab
-
WORK STATUS tab
-
Rapid Charts tab
Using Charting Templates
-
Overview of using Charting Templates
-
Access the Charting Workspace
-
Use the Charting Workspace Menu Bar
-
Use Charting Wizards
-
Use Charting Rapid Charts
-
Use Clinical Practices Guidelines
How to...
-
View Problems Lists
-
Document multiple injury visits
-
Work with prescriptions and medications
-
Check for potentially dangerous drug interactions
-
Add E&M codes to visits / the Audit E&M button
-
Learn how Net Health Employee Health and Occupational Medicine makes E&M calculations
-
Build and sign charting note
-
Add a Charting Note Addendum
-
Click the Addendum button on the menu bar of the [Generate Patient EMR Charting Note] window to display the [Visit Charting] window. This window shows the original charting note and any previous addenda.
-
You may change or view an existing addenda by highlighting it, then clicking Change. If the note or addendum has been locked, you will not be able to alter it.
-
To add an addendum, click the Addend button to display the [Addend Charting Note] window.
-
Provider shows the name of the provider from the visit. Change this, if need by by clicking the table icon
. Then, search for and select the correct provider. -
Optionally, change or add a clinician by clicking the table icon beside Clinician. Then, search for and select the correct clinician.
-
Enter the correct Summary by clicking the drop-down arrow beside it, then selecting your choice. This field will be used as the description anywhere charting notes are listed, so changing it from the default is a good idea.
-
You can enter text manually in this window, using the rich text formatting controls at the bottom.
-
The great majority of addenda are of predictable types. For your convenience in generating the addendum, Text Element buttons are included at the top of window from the Charting Template for the activities that most commonly require addenda. Clicking one of those buttons here will build the charting note just as it does when first creating the charting note.
-
When done, you can add an electronic signature, if your clinic uses that feature, by clicking Sign. Signing the addendum will lock it, preventing any future changes.
-
You may lock the note without adding an electronic signature by checking the box beside Manually Locked.
-
You may print the addendum by clicking Print.
-
Click Save when done.
Multi-User Access Prevention
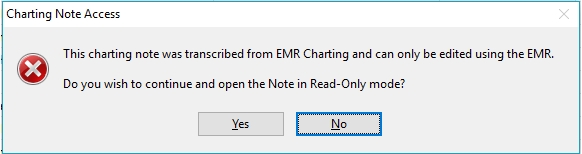
If a user is either adding or editing a Charting Note in the EMR Workspace (including creating an Addendum), access is denied to a second user wanting to add or edit the same Charting Note with the following message:
If the Period of Time (in hours) before automatically unlocking a clinical record parameter is not set, this note will remain unavailable to other users until the originator releases (saves) the record or an administrator unlocks it. If the parameter has a numeric hour value and no activity for this record is occuring, then the system will unlock the Charting Note after that hour limit has been exceeded.
-
-
Manage Orders
-
Print Exit Care patient discharge instructions
-
Log telephone calls